Quick & Easy: Make 3-Ingredient Chocolate Covered Strawberries
Imagine this: you're hosting an impromptu gathering, a sudden craving strikes, or you need an elegant dessert that looks like you spent hours in the kitchen – but you only have minutes. Enter the ultimate culinary hero:
chocolate covered strawberries. This delightful treat is not only stunning and incredibly satisfying, but it also requires just three simple ingredients. Forget complicated recipes and lengthy prep times; we’re about to unlock the secret to an impressive, crowd-plepleasing dessert that's as easy as it is delicious.
The Magic Behind the 3-Ingredient Chocolate Covered Strawberries
Why do chocolate covered strawberries consistently steal the show? It's a combination of factors that make them an unparalleled choice for any occasion. They strike the perfect balance between indulgence and freshness, offering a burst of juicy fruit enveloped in rich, decadent chocolate. But their true magic lies in their simplicity and versatility.
Here's why this seemingly simple dessert is an absolute game-changer:
- The Ultimate Quick Fix: With just three ingredients – fresh strawberries, your chosen chocolate, and a touch of oil – you can whip up a batch in under 20 minutes. It's the go-to "emergency dessert" for a reason!
- Effortlessly Impressive: Despite their ease, these treats look incredibly sophisticated. They instantly elevate any dessert spread, making you look like a seasoned patissier without the fuss.
- Bite-Sized Bliss: No need for plates or forks! Their perfect individual portions mean guests can easily grab one (or three!) without feeling overly full, even after a substantial meal. They're the ideal sweet bite.
- A Healthier Indulgence: For those mindful of their diet, chocolate covered strawberries offer a delightful compromise. They’re inherently gluten-free, and surprisingly, each piece can be as low as 47 calories! This makes them a fantastic option for those adhering to New Year's resolutions or simply seeking a lighter dessert. If you want to dive deeper into how these can impress without the calorie guilt, check out our guide on Impress Guests: 47-Calorie Chocolate Strawberries for Any Occasion.
- Versatile for All Diets: Naturally gluten-free, and easily made dairy-free with plant-based chocolate, they cater to a wide range of dietary preferences, ensuring everyone can enjoy a sweet treat.
This combination of ease, elegance, and adaptability is precisely why chocolate covered strawberries frequently grace tables at gatherings, parties, and even quiet evenings at home. They remove the pressure of elaborate dessert planning, allowing you to focus on the savory delights or simply enjoy the moment.
Crafting Your Perfect Chocolate Dipped Strawberries: A Step-by-Step Guide
Making truly exceptional chocolate covered strawberries isn't hard, but a few key steps and considerations will elevate your results from good to absolutely glorious.
Ingredient Selection: Quality Matters
While the recipe is simple, the quality of your ingredients significantly impacts the final taste and presentation.
- Strawberries: Opt for fresh, firm, ripe strawberries. Look for berries with vibrant red color and fresh green caps. Smaller to medium-sized strawberries tend to be easier to dip and eat. Avoid overly soft or bruised berries.
- Chocolate: This is where quality really shines. While chocolate chips can work, high-quality baking chocolate (bars or wafers) will melt smoother, taste richer, and provide a more beautiful, glossy coat.
- Dark Chocolate: Offers a rich, slightly bitter contrast to the sweet strawberry.
- Milk Chocolate: A classic, sweeter choice that's universally loved.
- White Chocolate: Creamy and sweet, perfect for drizzling or for a less intense chocolate flavor.
- Ruby Chocolate: For a unique, naturally pink and fruity flavor experience.
Avoid cheap chocolate chips if possible, as they often contain stabilizers that can make them harder to melt smoothly and can result in a duller finish.
- Oil: A tiny touch of neutral oil is your secret weapon. It softens the chocolate slightly, preventing it from cracking and flaking off the strawberry when you bite into it – a common disaster many home cooks face! It also adds a subtle, beautiful sheen.
- Coconut Oil: Our top recommendation. It's flavorless in small amounts and sets quickly.
- Vegetable Oil or Canola Oil: Neutral and readily available.
- Butter (clarified): Can be used but may impart a slight flavor.
For more in-depth advice on achieving that perfect, crack-free coating, don't miss our comprehensive article: Avoid Cracks: Tips for Perfect Chocolate Dipped Strawberries.
Preparation is Key
Before you even think about melting chocolate, proper strawberry preparation is paramount.
- Wash Thoroughly: Gently wash your strawberries under cool running water. Leave the green caps intact.
- DRY, DRY, DRY: This is perhaps the most crucial step! Chocolate and water do not mix. Any moisture on the strawberries will cause the chocolate to seize or simply not adhere. Pat them meticulously dry with paper towels. You can even let them air dry for 15-20 minutes on a clean towel or paper towels.
- Set Up Your Station: Line a baking sheet with parchment paper or wax paper. Have your chosen toppings ready in shallow bowls if you plan to use them.
Mastering the Melt
Achieving perfectly melted, smooth chocolate is essential for a beautiful finish.
- Double Boiler Method (Recommended for best results):
- Finely chop your chocolate (this helps it melt evenly).
- Place the chopped chocolate in a heat-proof bowl.
- Fill a saucepan with about an inch or two of water and bring it to a gentle simmer.
- Place the bowl of chocolate over the simmering water, ensuring the bottom of the bowl does not touch the water.
- Stir frequently with a dry spatula until the chocolate is smooth and completely melted. Remove from heat as soon as it's melted.
- Microwave Method (Quicker, but requires careful attention):
- Place chopped chocolate in a microwave-safe bowl.
- Microwave on medium power (50%) in 30-second intervals, stirring thoroughly after each interval.
- Continue until the chocolate is almost entirely melted, then stir until completely smooth. Be careful not to overheat, as this can cause the chocolate to burn or seize.
- Incorporate the Oil: Once your chocolate is perfectly melted and smooth, stir in a tiny amount of your chosen oil – start with about ½ teaspoon per cup of chocolate. Stir until fully combined and the chocolate has a beautiful, glossy consistency.
Dipping and Decorating
This is where the magic happens!
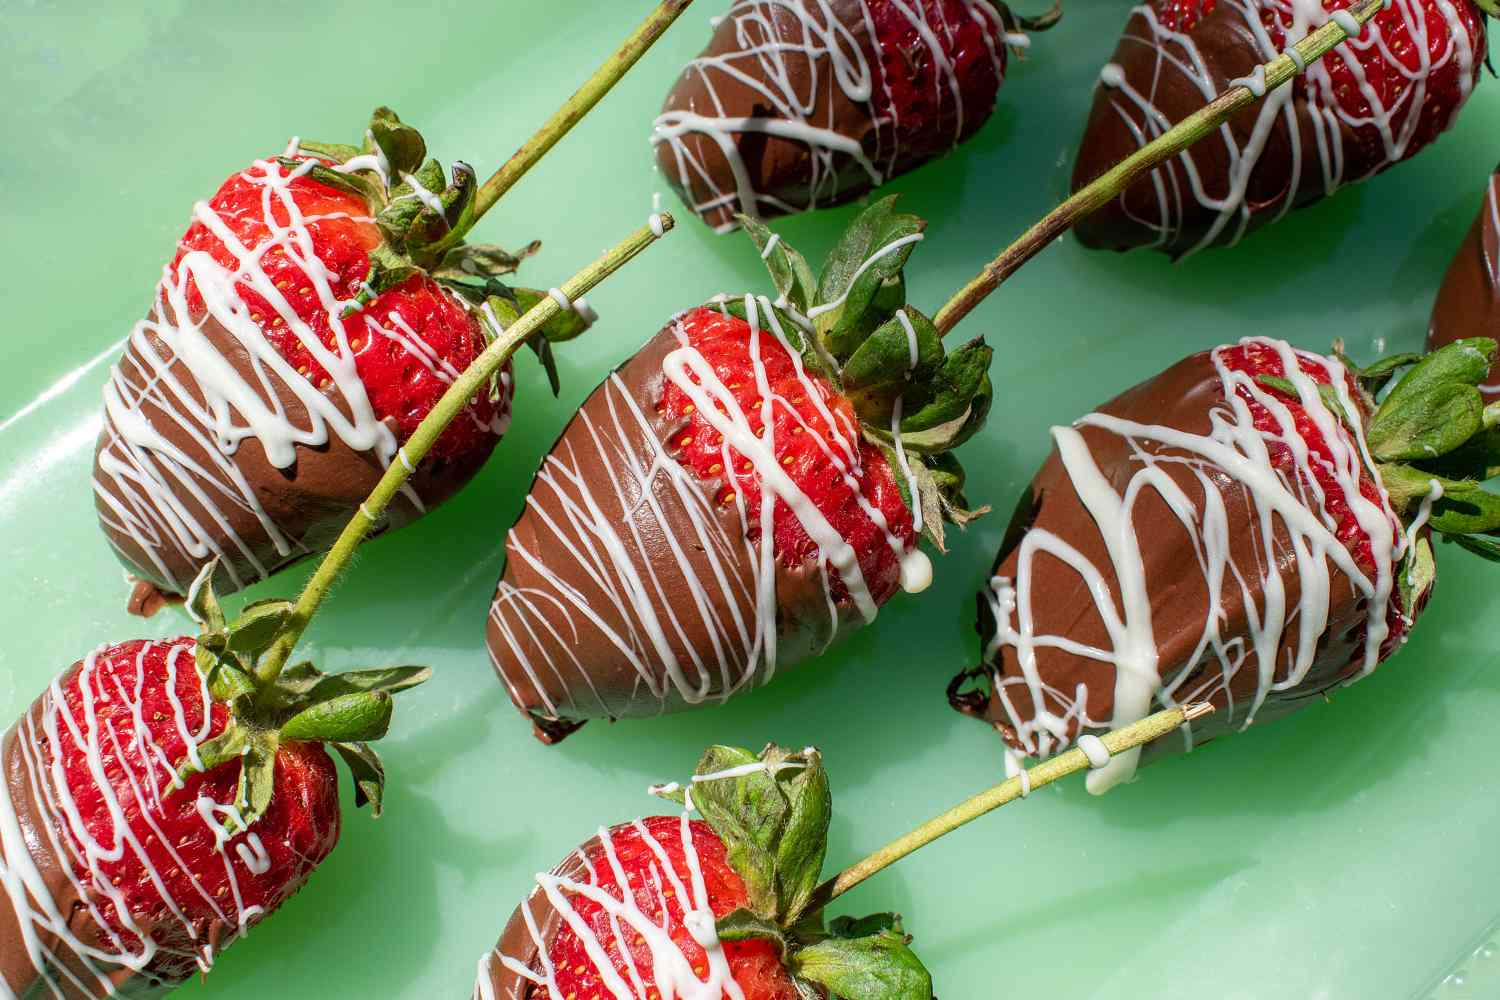
- Dip: Holding a dry strawberry by its green cap, dip it into the melted chocolate. Rotate and tilt the bowl to fully coat the strawberry, leaving a small portion of the top (the green cap area) uncovered.
- Remove Excess: Gently lift the strawberry, allowing any excess chocolate to drip back into the bowl. You can lightly tap the wrist holding the strawberry against the edge of the bowl to encourage drips. This prevents puddles of chocolate at the bottom of your set strawberries.
- Decorate (Optional): If adding toppings, sprinkle them onto the chocolate while it's still wet, or gently roll the dipped strawberry in a bowl of your chosen topping. Creative options include:
- Finely crushed nuts (pistachios, almonds, pecans)
- Shredded coconut (toasted or plain)
- Colorful sprinkles
- A drizzle of contrasting melted white, dark, or milk chocolate
- A dusting of cocoa powder
- Mini chocolate chips
- Set: Place the dipped strawberries onto your prepared parchment-lined baking sheet. For a quick set, you can place the tray in the refrigerator for 10-15 minutes, or allow them to set at room temperature for about 30-60 minutes, depending on the ambient temperature.
Beyond the Basics: Tips for Success & Creative Flair
Even with such a simple recipe, a few extra insights can make your chocolate covered strawberries truly stand out.
- Temperature Control: Ensure your melted chocolate isn't too hot, as this can cook the strawberries. It should be warm enough to be liquid and spreadable, but not scalding.
- Don't Rush the Dry: We can't stress this enough – dry strawberries are critical. If you're short on time, a gentle blow dry with a hairdryer (on a cool setting!) can help, but careful patting is usually sufficient.
- Storage Savvy: Store your chocolate covered strawberries in a single layer in an airtight container in the refrigerator. They are best enjoyed within 1-2 days. The chocolate may "sweat" slightly if moved from cold to warm too quickly, so try to serve them relatively soon after removing from the fridge.
- Presentation is Everything: Arrange them artfully on a platter, perhaps with a sprinkle of edible glitter or a few fresh mint leaves. For special occasions, consider arranging them in a "bouquet" by inserting wooden skewers into the base of each strawberry before dipping.
- Flavor Infusions: For an extra layer of flavor, consider adding a tiny drop of extract (like vanilla, almond, or peppermint) to your melted chocolate before dipping. A pinch of sea salt on dark chocolate-dipped strawberries is also divine!
These delightful 3-ingredient chocolate covered strawberries are a testament to the power of simplicity. They prove that you don't need a pantry full of exotic ingredients or hours of dedicated time to create a dessert that is both stunning and utterly delicious. Whether you're a seasoned baker or a kitchen novice, these treats are an accessible, impressive, and satisfying indulgence for any moment. So, grab your berries, melt your chocolate, and prepare to delight!